Configuring branches and Branch clients
When you set up a location to give visitors access to Unblu Branch, you must provide Unblu with information about the Branch clients and other devices available at that location. You can do so in the Branch editor or using the Unblu web API.
Configuring branches with the Branch editor
Once you’ve created a branch, clicking it in the branch overview in the Account Configuration interface opens the Branch editor.
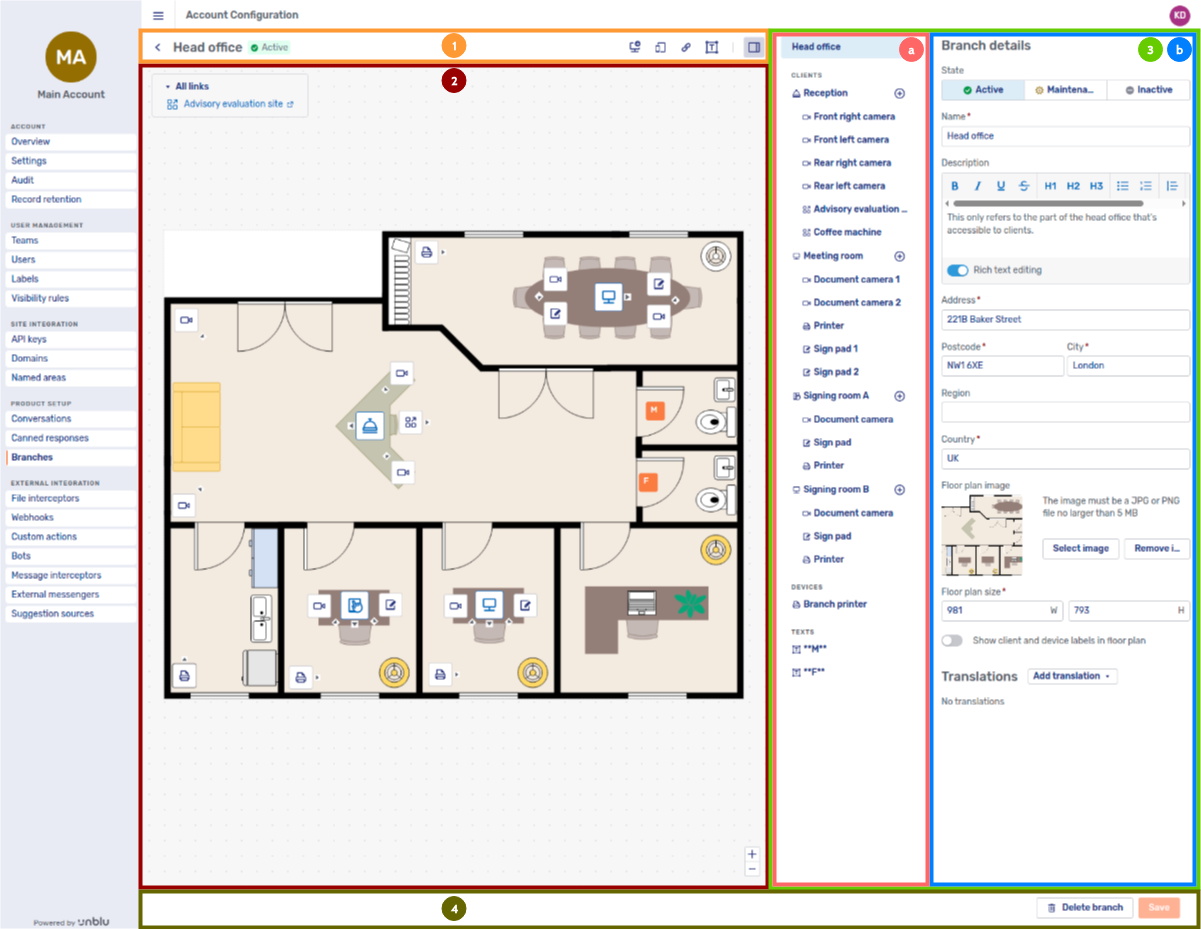
The Branch editor has a number of areas, labeled in the image above:
-
The toolbar, which displays the name and state of the branch you’re viewing. It also has a number of buttons:
Table 1. Buttons in the Branch editor toolbar Button Function 
Back button. Click to return to the branch overview page.

"Add Branch client" button.

"Add Branch device" button.

"Add Branch link" button.

"Add text box" button.

"Toggle side panel" button. Hides the side panel if displayed and vice versa. Hiding the side panel can be useful if the floor plan takes up more space than is available.
-
The floor plan. This is where you arrange the different Branch elements so agents know where they are in the branch. It’s also where new elements appear when you add them to the branch.
-
Branch clients, Branch devices, and Branch text boxes all appear in the center of the floor plan. If you add multiple Branch elements before moving its icon to a different location, the icons of the elements you added earlier are hidden by the most recent one.
-
Branch links appear in a box in the upper left-hand corner of the floor plan area.
-
-
The side panel, which itself has two distinct areas:
-
The Branch element overview. This area contains a list of all the Branch elements that have already been added to the branch. The different Branch elements — Branch clients, Branch devices, Branch links, and text boxes — are grouped under their own headings in the overview.
If you add translations to the branch, the Branch element overview also contains a select element at the top where you can choose the language you want to edit.
If a branch or Branch element is missing compulsory information, Unblu displays an Error icon
 next to its name in the Branch element overview.
 -
The main area of the side panel. This is where you edit the Branch element you selected in the Branch element overview.
-
-
The footer. This area contains buttons to delete the branch on display and to save the changes you’ve made to it.
The Save button applies to the branch as a whole, not to any individual Branch element you may be editing in the side panel.
Editing branch details
The Branch editor opens with the side panel showing the details of the branch you clicked in the branch overview:
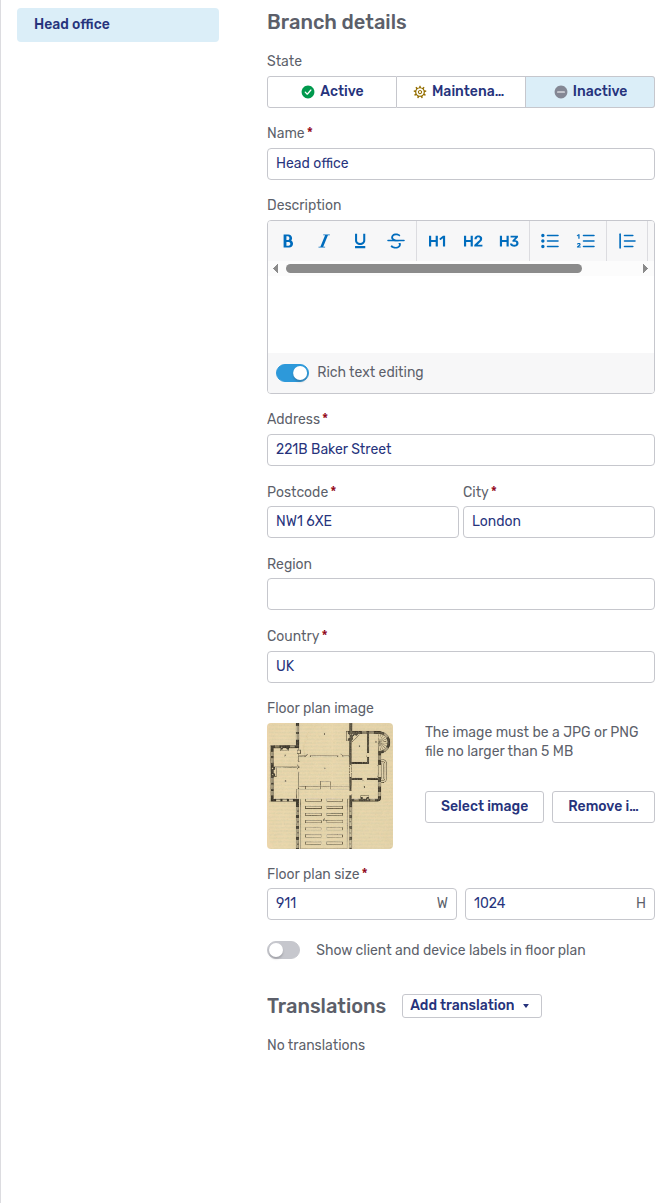
If you just created the branch in the Account Configuration interface, you have to add the following information:
-
Address
-
Postcode
-
City
-
Country
-
Floor plan size
| In theory, you can specify the size of a branch’s floor plan without providing an image of the floor plan itself. In practice this can lead to the Branch editor behaving in unexpected ways once you start adding elements to the branch. |
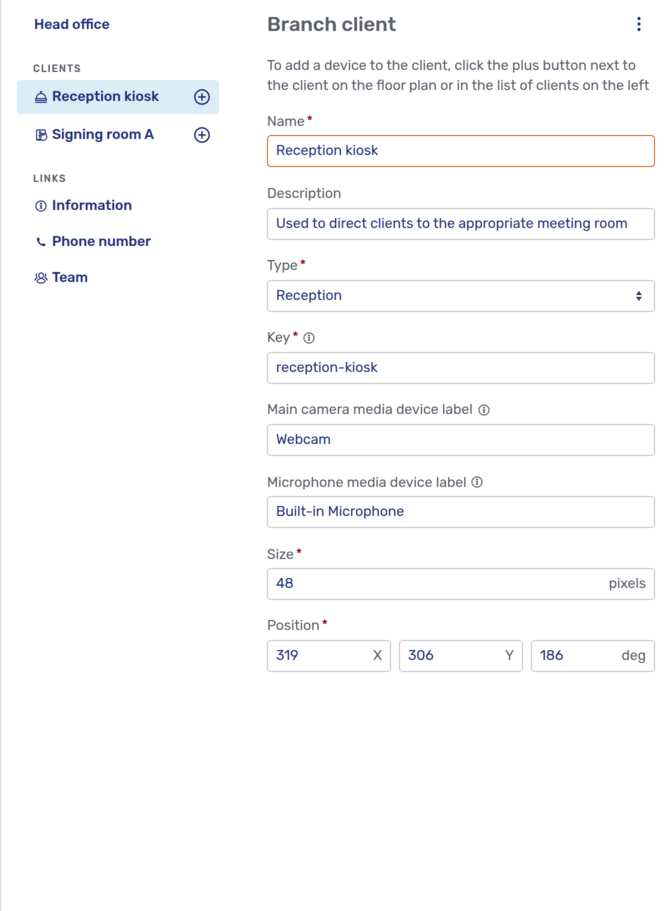
Adding and configuring Branch clients
To add a Branch client to a branch, click the in the Branch editor toolbar. The new Branch client’s icon is added to the center of the floor plan, and the side panel displays the new Branch client so you can edit its details:
-
The type of Branch client affects how the client appears on the floor plan. It doesn’t have any other effect.
There are four different types of Branch client:
Table 2. Types of Branch client Icon Name 
Meeting room

Reception

Self-service
Other
-
The key must be unique across all Branch elements within an Unblu account.
-
The size refers to the size of the icon as it appears in the floor plan.
-
The position of the Branch client’s icon must lie within the floor plan. The X and Y coordinates refer to the top left corner of the icon. If the branch doesn’t have a floor plan, the icon must be positioned within the area specified for the floor plan.
Once you’ve saved the branch with the new Branch client, the side panel for the Branch client shows a kebab menu  in the upper right-hand corner. The menu gives you access to three actions:
| Icon | Action |
|---|---|
|
Copy the URL to open the Branch client in the Branch client setup |
|
Invalidate the Branch client’s token. If you click this, you must generate a new token for the Branch client before you can use it. |
|
Delete Branch client |


You can add cameras, devices, and links to a Branch client. Refer to Adding elements to Branch clients below.
Adding and configuring Branch devices
Branch devices are devices that can be operated and controlled independently of a Branch client. For example, the door to the meeting room with a Branch client may be locked, and you want agents to be able to unlock it when they direct a visitor there.
To add a Branch device, click the Add device button in the Branch editor toolbar. The new Branch device’s icon is added to the center of the floor plan, and the side panel displays the new Branch device so you can edit its details:
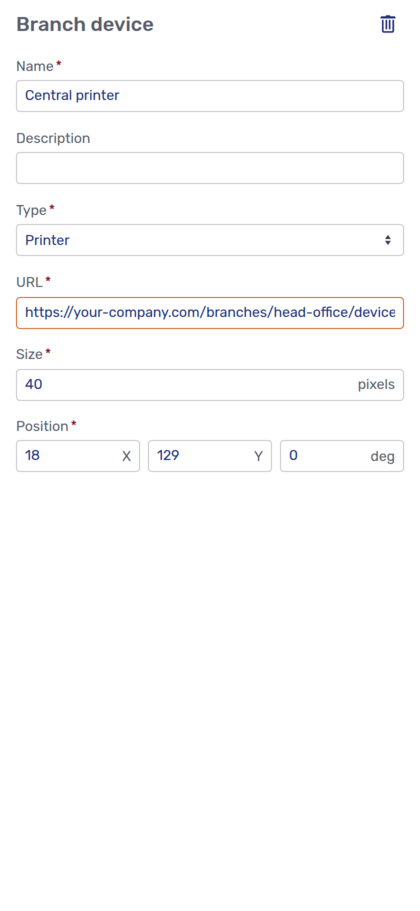
There are six different types of Branch device, listed in the table below. The type of device doesn’t affect how Unblu treats them. It determines the icon used to display the Branch device on the floor plan.
| Icon | Name |
|---|---|
|
Door |
|
External application |
|
Information |
|
Lock |
|
Printer |
|
Sign pad |
|
Other |


Adding and configuring Branch links
Branch links are meant to provide quick access to information and other applications. In the Agent Desk, they appear in an area in the upper left-hand corner of the floor plan.
To add a Branch link, click the Add link button in the Branch editor toolbar. The new Branch link is added to the link area in the upper left-hand corner of the floor plan, and the side panel displays the new Branch link so you can edit its details:
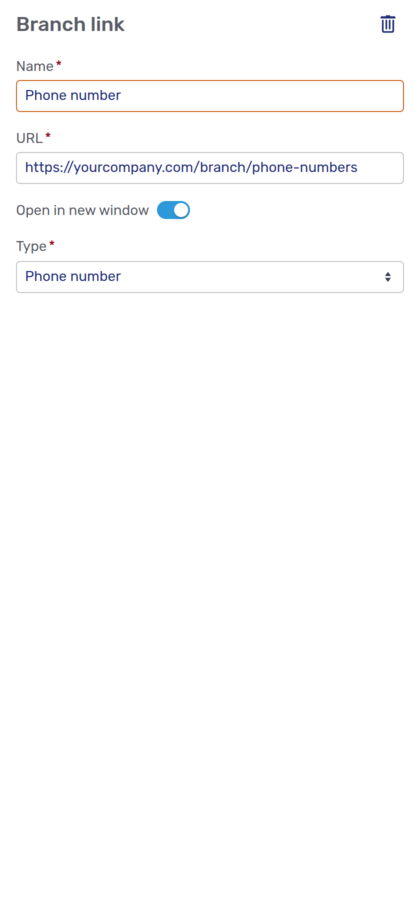
Specify all the required values as well as whether to open the link in a new window when it’s clicked.
There are six different types of link. The type of link determines the icon displayed next to the link on the floor plan.
| Icon | Name |
|---|---|
|
External application |
|
Information |
|
Phone number |
|
Team |
|
Time |
|
Other |


Adding and configuring text boxes
Text boxes are intended to display information on the floor plan.
To add a text box, click the Add text button in the Branch editor toolbar. The new text box is added to the center of the floor plan, and the side panel displays the new text box so you can edit its details:

Adding elements to Branch clients
You can add devices, cameras, and links directly to a Branch client by clicking the plus icon  next to the Branch client’s name in the Branch element overview. This opens a popup menu where you can select the type of device you want to add to the Branch client:
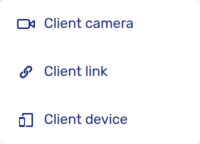
You can add the following types of element to a Branch client:
| Icon | Name |
|---|---|
|
|
|
|
|

Client cameras
When you add a camera to a Branch client, Unblu opens it in the side panel:
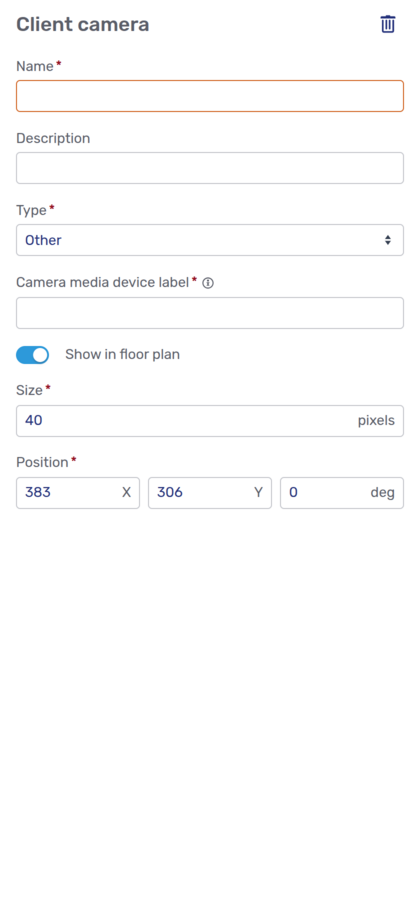
There are three different types of camera:
-
Document cameras
-
Room cameras
-
Other cameras
There’s no difference between how Unblu treats the different types.
Client devices
When you add a device to a Branch client, Unblu opens it in the side panel. The side panel looks the same as for Branch devices.
The types of device you can add are the same as for Branch devices.
Client links
When you add a link to a Branch client, Unblu opens it in the side panel:
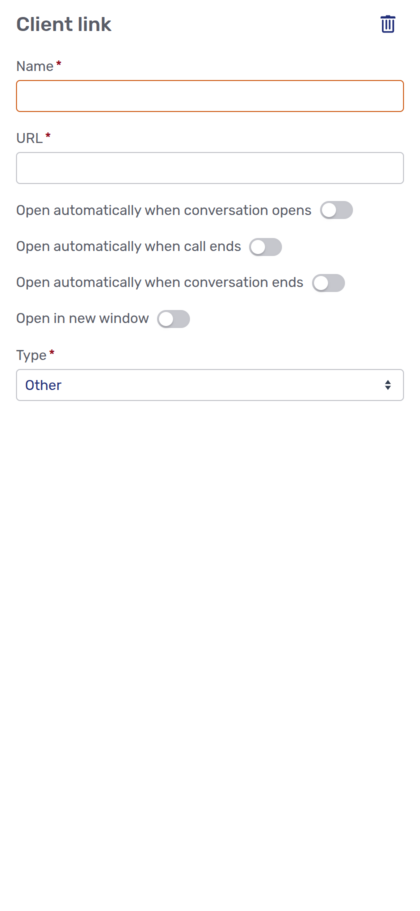
You can control when and how client links should open. A link can open automatically when a conversation opens, when a conversation ends, and when a call ends. You can also specify whether the link should open in a new window.
The types of client link you can add are the same as for Branch links.
Labeling Branch elements in different languages
If you want to label a branch or its elements in more than one language, you must first add the language to the branch. To do so, open the branch in the side panel, click Add translation, and select the language you want to add. Repeat this for each language you want the branch to be available in.
Once you’ve added a translation, you can use the select element at the top of the Branch element overview to view and edit the branch and its elements in different languages.
| Some changes you make to translations apply to all languages. For example, if you change the position of, say, a Branch client in German, its position also changes in all the other languages you’ve added. Only fields such as the name and the description are unique to a translation. |
Configuring branches with the Unblu web API
If you prefer, you can configure branches using the Unblu web API. There are endpoints for managing both branches and Branch clients.
When you create or update a branch, you can specify its Branch clients, devices, text boxes, and links.
-
To update a Branch device, text box, or link, you must update the Branch by calling the
/branches/updateendpoint with the new information. -
To update a Branch client, you can either update the branch or call the
/branchclients/updateendpoint for the Branch client itself.
See also
-
For information on setting up Branch clients as a Branch technician, refer to the Branch client setup guide.
-
For information on other aspects of Unblu Branch in the Account Configuration interface, refer to the Branches section of the Account Configuration interface guide.
-
For general information on configuring Unblu Branch, refer to Unblu Branch configuration.