Branch client setup interface guide
Some of the steps required to set up a Branch client have to be carried out from the Branch client setup interface on the device itself, either physically or by some means of remote access.
Accessing the Branch client setup interface
The interface is accessible to users with the WEB_USER role who have the property com.unblu.branch.makeVisitorBranchClientTechnician set to true.
The URL to access the Branch client setup interface is defined in <com.unblu.identifier.publicServerBaseUrl>/<com.unblu.identifier.publicPathPrefix>/branch-client-setup. As a rule, the part of the URL before /branch-client-setup is the same as the URL to access Unblu as a visitor.
Overview pages
After logging in, you see an overview of all branches in the states Active or Maintenance. The branches appear in alphabetical order.
You see:
-
The name of the branch
-
The description of the branch (if present)
-
The number of Branch clients
-
The branch’s state
Clicking a branch opens an overview of its clients. The list shows:
-
The Branch client’s name
-
Its description (if present)
-
The number of auxiliary cameras
-
The number of links
Branch client setup page
Clicking a Branch client opens the setup page of the Branch client in question. The setup page has the following sections:
-
The Main media section is for configuring the client’s main camera and microphone.
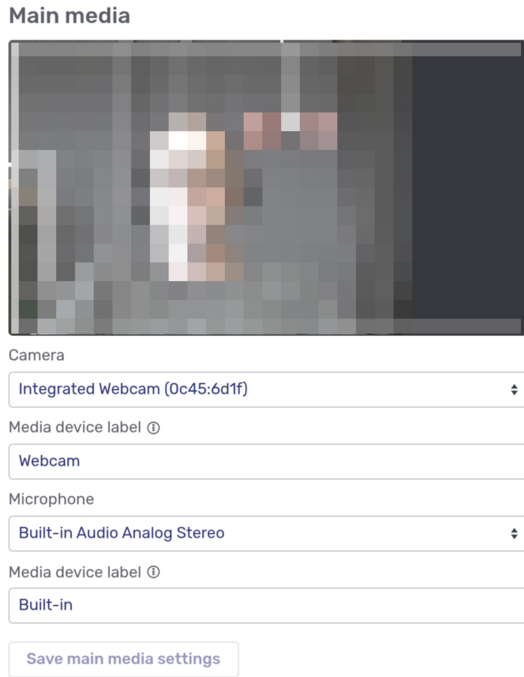 Figure 1. Branch client main media setup
It shows the view of the main camera and the following form fields:
-
A select element to choose the camera for the main media
-
A text field for the media device label associated with the main media camera
-
A select element to choose the microphone for the main media
-
A text field for the media device label associated with the main media microphone
For the camera and microphone to work, you must grant access to them in the browser.
The media device labels must be part of the device names as listed in the respective select element.
-
-
The Auxiliary cameras section is for configuring additional cameras attached to the client.
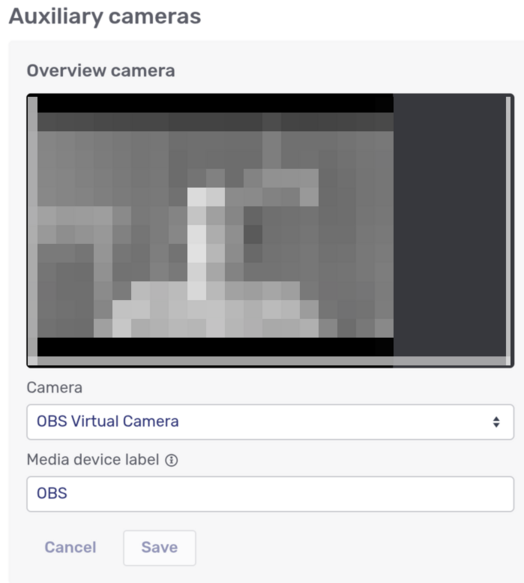 Figure 2. Branch client auxiliary camera setup
The cameras only appear if they’ve been added to the Branch client in the Branch editor. Each auxiliary camera is listed with its name. Select the camera to assign to that name and give it a media device label if it doesn’t already have one.
The Save button for an auxiliary camera doesn’t become active until you navigate away from the field you edited.
-
The Branch client entry point section specifies how the Branch client accesses Unblu:
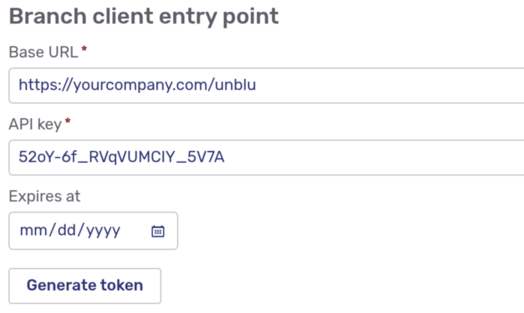 Figure 3. Branch client entry point setup
It has the following elements:
-
The base URL that the Branch client should use to connect to Unblu. Depending on how your organization has configured Unblu, this field may already contain a value.
-
The API key the Branch client should use. This field already contains the default value. Verify that this is the API key that the Branch client should actually use.
-
The Expires at date picker to specify when the token that controls access should expire.
-
A Generate token button. When you click the button, Unblu generates and displays a token and the base URL for the Branch client.
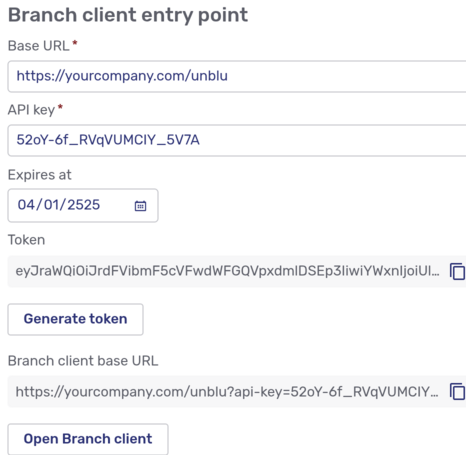 Figure 4. Token and base URL for Branch client
Both values have a Copy button.
The base URL also has a button to open the Branch client directly. If you click it, Unblu asks you whether you want to log out before opening the Branch client.
Store the generated token. There’s no way of retrieving it if you lose it.
-
See also
-
For general information on configuring Unblu Branch, refer to Configuring Unblu Branch.
-
For information on configuring the Unblu Branch UIs, refer to Unblu Branch UI theming.
-
For information on setting up a branch in the Account Configuration interface, refer to the Branches section of the Account Configuration interface guide.
-
For information on the Branch editor, refer to Configuring branches and Branch clients.