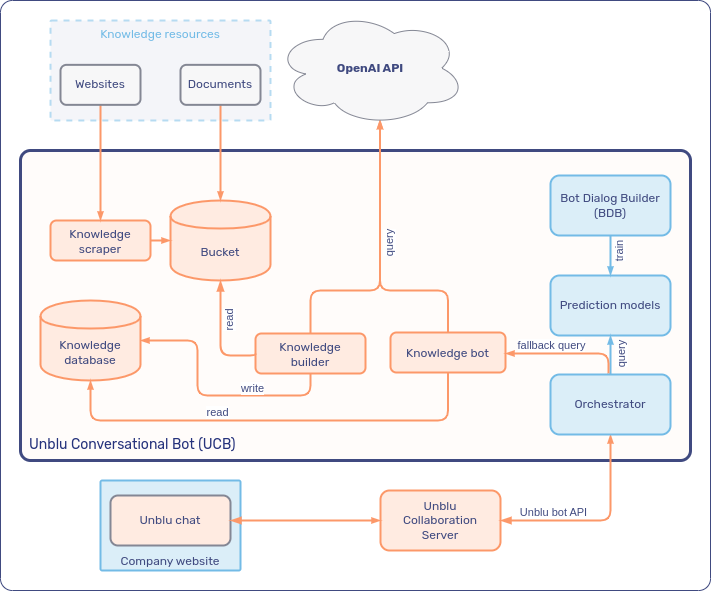
The knowledge bot
The Unblu Conversational Bot (UCB) uses a natural language understanding (NLU) algorithm to determine a visitor’s intent. Unfortunately, there’s no way to guarantee that there’s always an appropriate intent that corresponds to the visitor’s utterance.
To deal with such cases, you can activate a second bot in the UCB, the knowledge bot.
The knowledge bot uses ChatGPT, a chatbot based on a large language model (LLM), to query a knowledge database with the visitor’s utterance. The knowledge database is constructed from the resources you specify.
The following diagram gives you an overview of the knowledge bot’s architecture:
Configuring the knowledge bot
There are three aspects of the knowledge bot that need configuring:
-
The knowledge resources used to create the knowledge database.
-
The persona that the knowledge bot should respond with.
-
The database the knowledge bot generates answers from.
Knowledge resources
To respond to visitors' questions, the knowledge bot needs information to base its responses on. You must provide it with this information. To do so, you specify knowledge resources to create a knowledge database.
When considering which resources to add, adhere to the following rules of thumb:
-
Only add resources containing information that can be shared publicly.
Your corporate intranet, for example, probably contains information that you would like the knowledge bot to use when it generates responses for visitors. However, it almost certainly also has sensitive information that shouldn’t become publicly available. You should therefore exclude pages with sensitive information if you decide to scrape your intranet for the knowledge bot.
If you’re unsure whether a resource contains sensitive information, exclude it from the knowledge bot’s resources.
-
Only add resources you know the content of.
For example, your organization may have a forum where customers can ask questions. However, these questions may contain unreliable or incorrect information, or even malicious content—a link to a phishing website, for example. If you add these resources, the knowledge bot may provide visitors with incorrect information or send a visitor malicious content.
If the content of a resource isn’t under your control, you should use extreme caution before adding it to the knowledge bot’s resources.
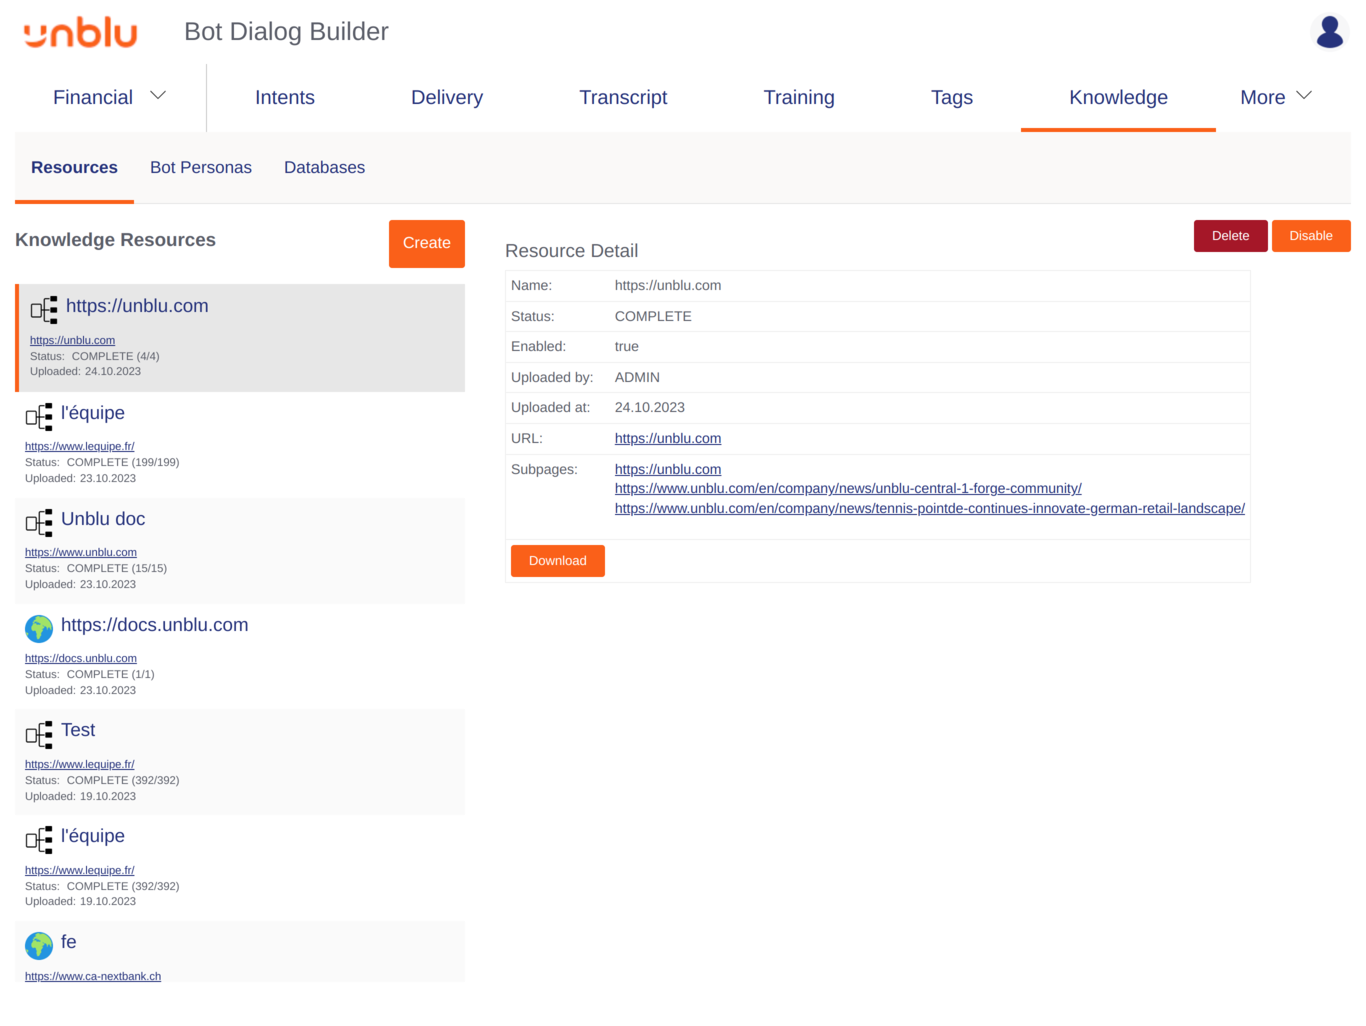
Opening the Knowledge tab in the Bot Dialog Builder (BDB) displays the Resources tab, which lists the knowledge resources that have already been added:
Creating a knowledge resource
To add a new resource, follow these steps:
-
Click the Create button. This opens a form in the main area of the window.
-
Enter a name for the resource in the first text field.
-
Select the type of resource you want to upload, File or URL.
If you want to add a file that’s accessible through a URL, such as a PDF available on your organization’s website, you must first download the file, then upload it as a File from your computer.
How you continue depends on the type of resource you selected.
-
If you selected File:
-
Click Choose File to select the file you want to add as a knowledge resource.
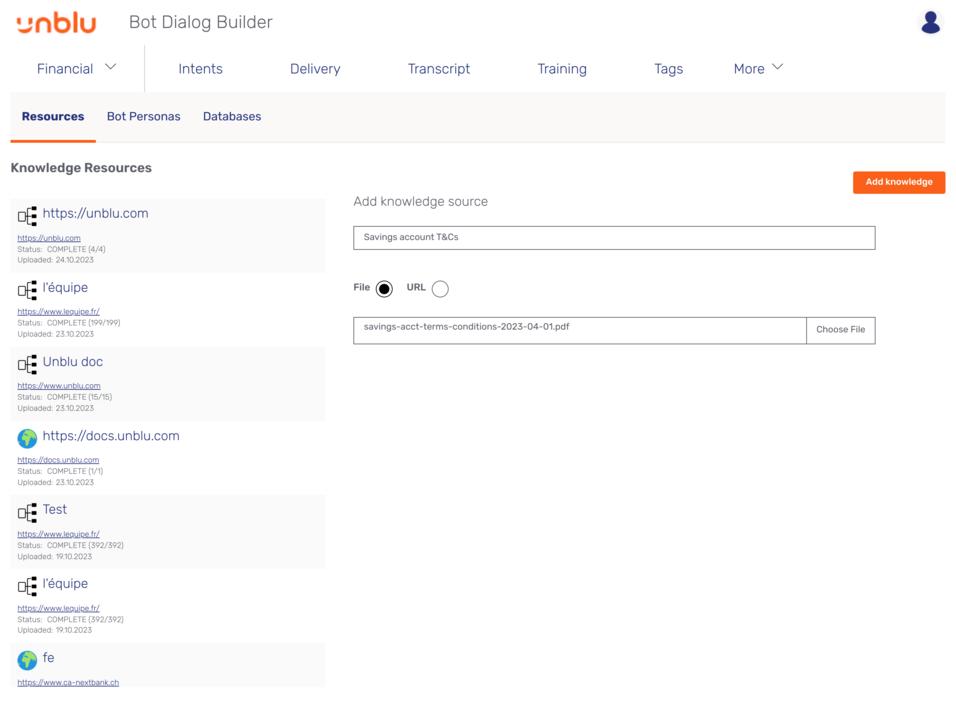 Figure 3. Add knowledge source form for a file resource
You can upload files in the following formats: CSV, HTM, HTML, JSON, MD, PHP, PDF, RSS, SHTML, and TXT. If you try to upload other file types, an error message appears
-
Click Add knowledge to create the knowledge resource.
-
-
If you selected URL:
-
Enter the URL you want to add in the text field below the type selector:
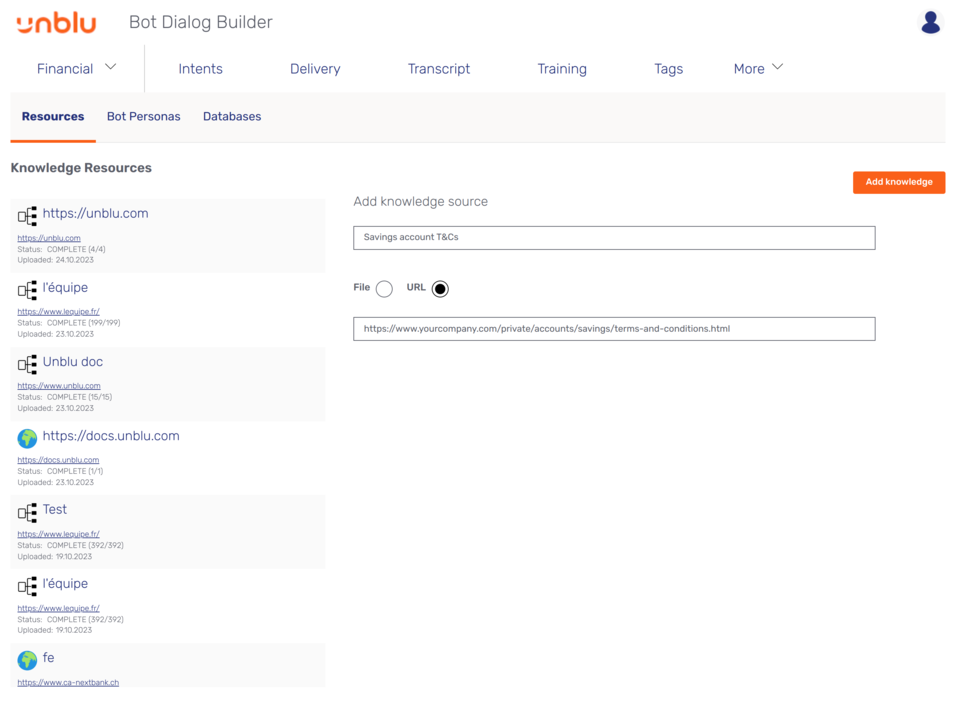 Figure 4. Add knowledge source form for a URL resource
 -
Click Add knowledge.
If there’s a sitemap associated with the URL you entered, the UCB lists the pages it found:
Selecting the subpages to add to a new URL resource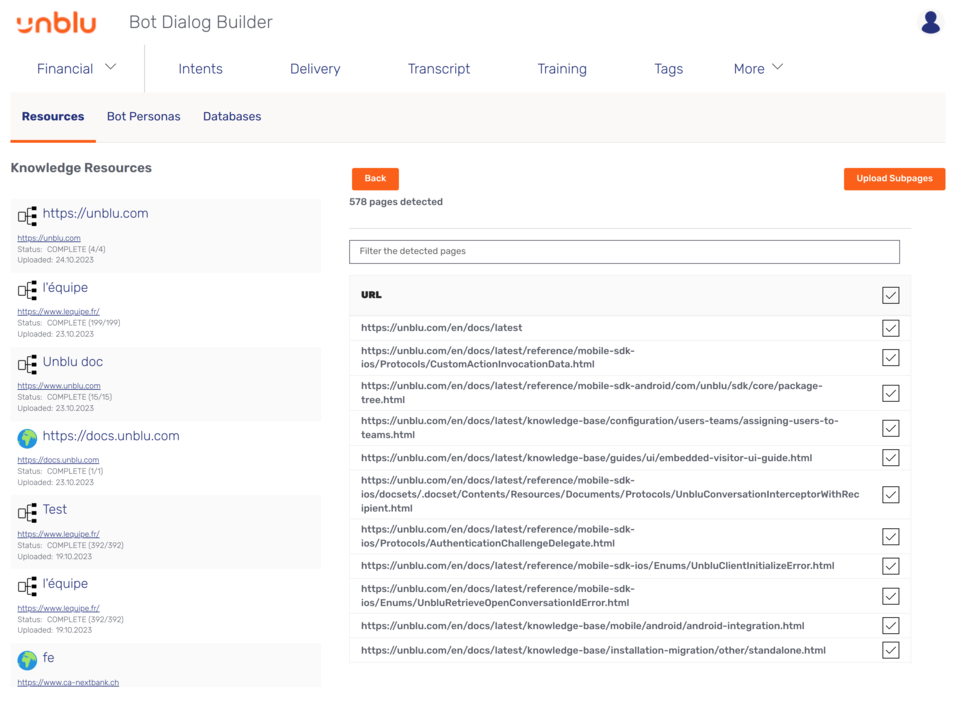
You can filter the subpages by entering a substring (not a regular expression) of the URLs you’re interested in and hitting the Enter key.
To exclude a page from the resource, uncheck its checkbox.
-
When you’ve made your selection, click Upload Subpages.
-
Reviewing existing knowledge resources
Clicking a knowledge resource displays its details on the right. The details you see are:
- Name
-
The name assigned to the resource by the person who added it.
- Status
-
The status of the resource.
-
If the resource is still being processed, its status is SCRAPING.
-
Once a resource has been processed, its status changes to COMPLETE.
-
If a problem arises during scraping, the resource’s status is set to SCRAPE_FAILED.
-
If it wasn’t possible to start scraping, the resource’s status is set to START_SCRAPE_FAILED
-
- Enabled
-
Whether the resource is enabled or not. Only enabled resources can be added to the knowledge bot’s knowledge database.
By default, resources are enabled. To disable a resource, click Disable in the upper right-hand corner of the resource details.
- Uploaded by
-
The username of the person who uploaded the resource.
- Uploaded at
-
The date when the resource was uploaded to the UCB.
- Filename
-
The name of the uploaded file. This is only present if the knowledge resource is a file that was uploaded directly to the UCB.
- URL
-
The URL of a web page or website. This is only present if the knowledge resource is a URL.
- Subpages
-
Pages under the URL that were included when scraping the website. By default, the list of subpages only contains the first ten subpages. Click Load More to see the URLS of more subpages included.
This is only present if the knowledge resource is a URL.
To review the contents of a resource, click the Download button. For web resources, this downloads a tarred and gzipped archive of the resource. Files are downloaded without archiving beforehand.
Deleting knowledge resources
To delete a resource, click it in the resource overview, then click the Delete button in the upper right-hand corner of the resource details. The BDB displays a confirmation dialog asking Are you sure you want to delete the resource <resource name>?. Click Yes to delete the resource or No to cancel the deletion.
Deleting a resource doesn’t remove it from any knowledge databases you created with the resource.
Bot personas
The knowledge bot doesn’t simply string together sentences it finds in the knowledge database. It generates its own responses based on the information it retrieved. You can influence the tone of the knowledge bot’s answers by creating a persona with the traits you want the knowledge bot to exhibit. This allows you to create responses in a tone that’s in line with your organization’s branding.
To create a persona for the knowledge bot:
-
Click Bot Personas on the Knowledge tab, then click the Create button.
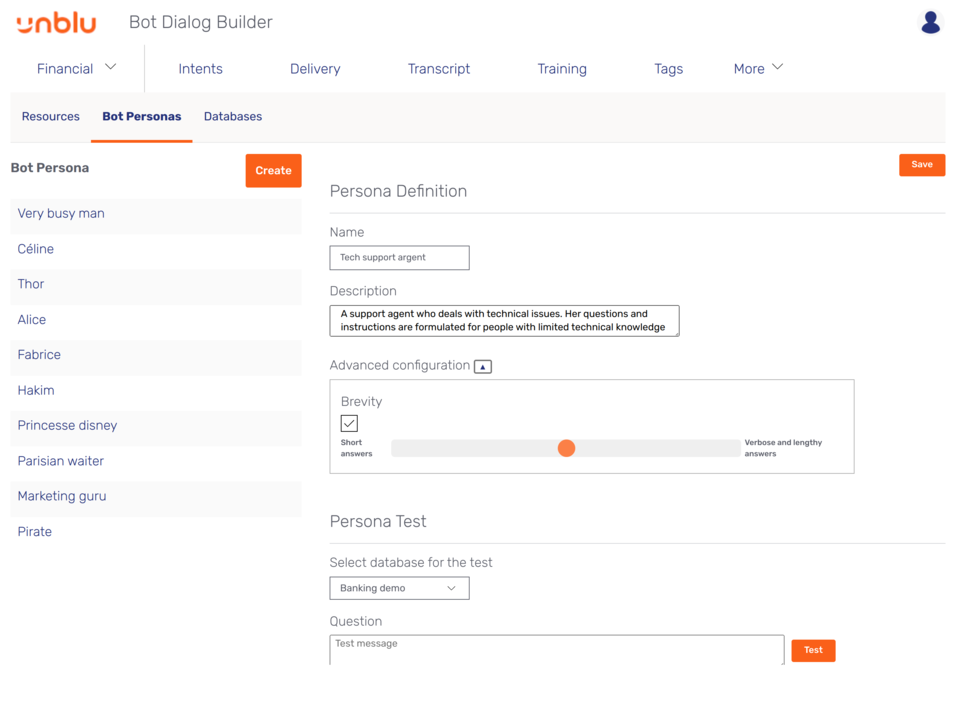 Figure 5. Persona definition form
 -
Fill in the Persona Definition section of the form that appears.
- Name
-
The name you want to assign the persona.
- Description
-
The description. This is what defines the bot’s persona. It’s used to set the tone of the response it generates. If you want the knowledge bot to respond in the style of, say, a friendly but impersonal butler, the description might be something like "A butler who speaks to their employer in a friendly, courteous, but largely impersonal tone."
- Advanced configuration
-
Open the Advanced configuration to access the bot persona’s Brevity feature. This allows you to configure the persona’s verbosity independently of the tone.
-
The Persona Test section lets you check how the knowledge bot responds given the persona you defined.
Select a knowledge database for the test, enter a question in the Question text field, and click the Test button. In the Answer text area, you’ll see how the knowledge bot would answer your question given the persona you defined above.
-
When you’re happy with your new bot persona, click Save in the upper right-hand corner.
Reviewing existing bot personas
To review, update, or delete a bot persona, click its name on the Bot Personas tab:
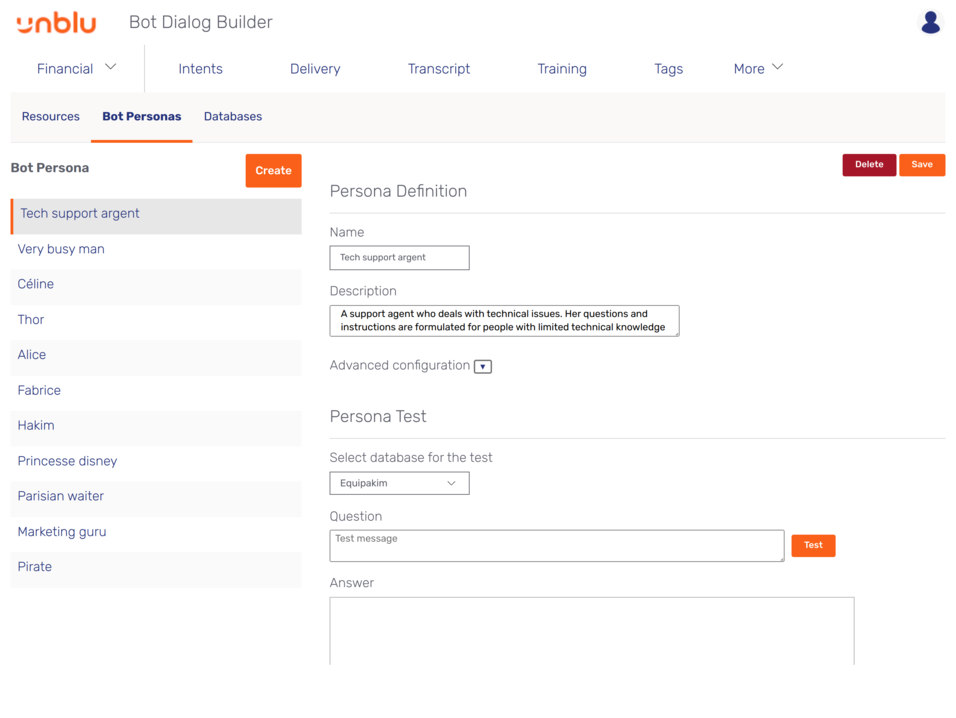
You can make changes to the bot the same way as when you created it, then test your changes in the Persona Test section. When you’re happy with your changes, click the Save button.
To delete a bot persona, select it and click the Delete button. A modal dialog appears asking Are you sure you want to delete the persona <persona name>? Click Yes to delete the persona or No to cancel the deletion.
Databases
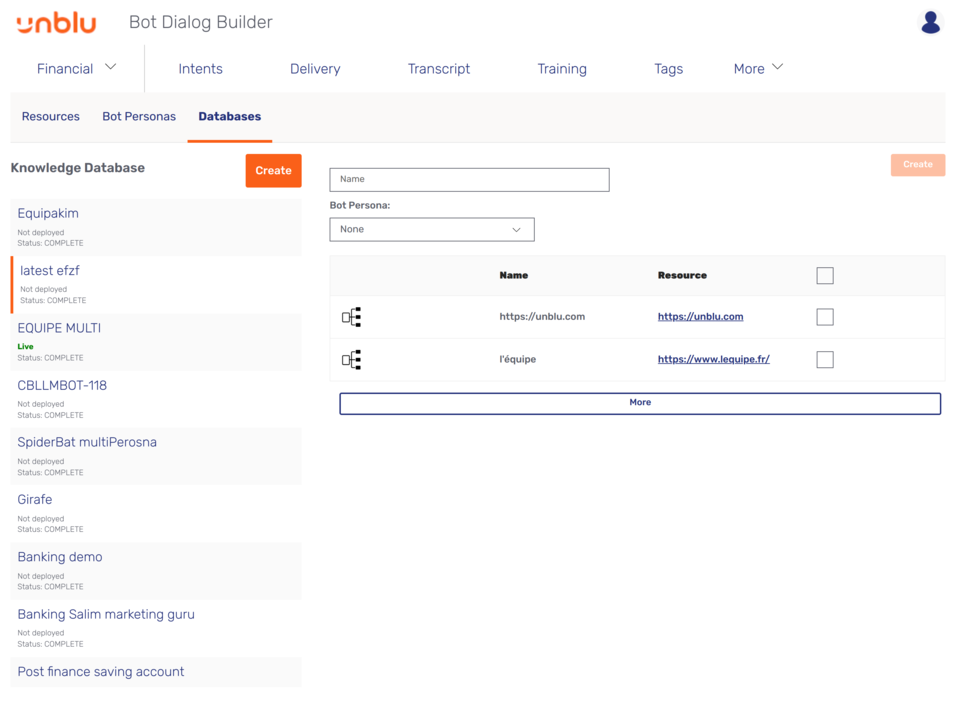
Once you’ve added your knowledge resource and created a persona for the knowledge bot, you can create the knowledge database that the bot should use to respond to visitors. To do so, click Databases on the Knowledge tab, then click the Create button to open the Create Database form:
-
In the first text field, enter a name for the database.
-
Next, select the bot persona you want to use with the database.
-
Select the knowledge resources you want to include in the database by checking each resource’s checkbox in the list.
If the resource you want to add isn’t visible, click the More button to display more resources. If it still doesn’t appear, make sure the resource isn’t disabled.
-
Click the Create button in the upper right-hand corner to create the database.
Reviewing existing databases
Clicking a database in the list on the left displays its details in the main area of the tab.
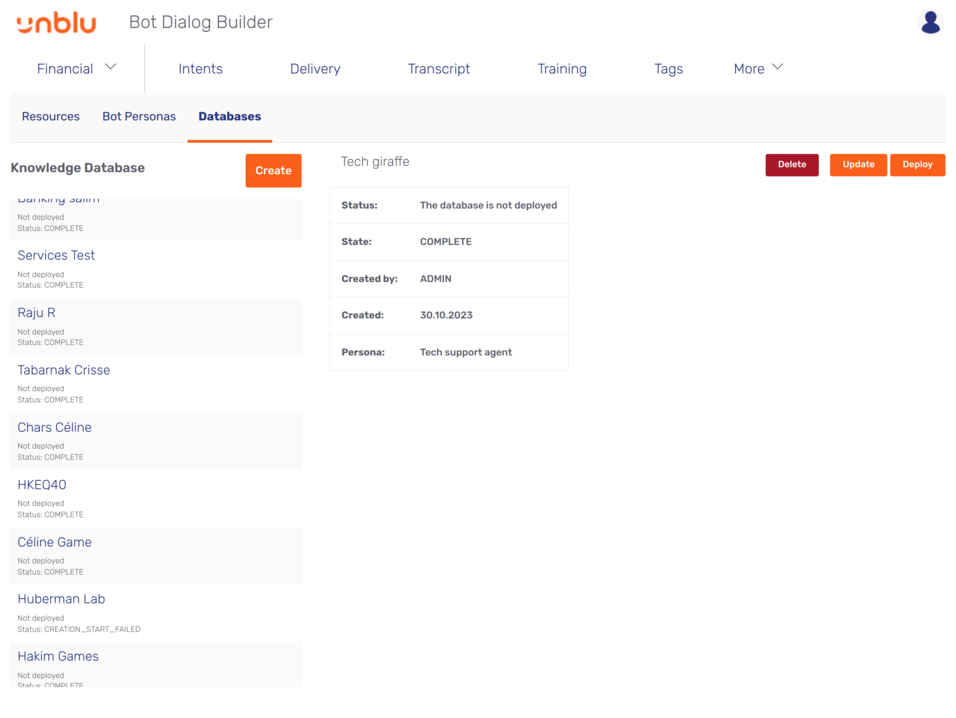
The information displayed is:
- Status
-
Tells you whether the database is live—that is, deployed—or not.
Only one database can be live at any one time.
- State
-
Tells you whether the database was created successfully or not.
-
While it’s being generated, the state of a database is CREATING.
-
Once a database has been generated successfully, its state changes to COMPLETE.
-
If an error occurs while generating the database, its state is set to CREATION_FAILED.
-
If it wasn’t possible to start creating the database, its state is set to START_CREATION_FAILED.
-
- Created by
-
The username of the person who created the database.
- Created
-
The date the database was created.
- Persona
-
The bot persona that the database uses.
Deploying, updating, and deleting a database
-
To deploy a database, click the Deploy button. This deploys the database and reverts the deployment of the database currently deployed immediately.
You can only deploy a database whose state is COMPLETE.
-
To update a database, click the Update button. This makes the Name text field editable and lets you select a different bot persona:
Updating a knowledge database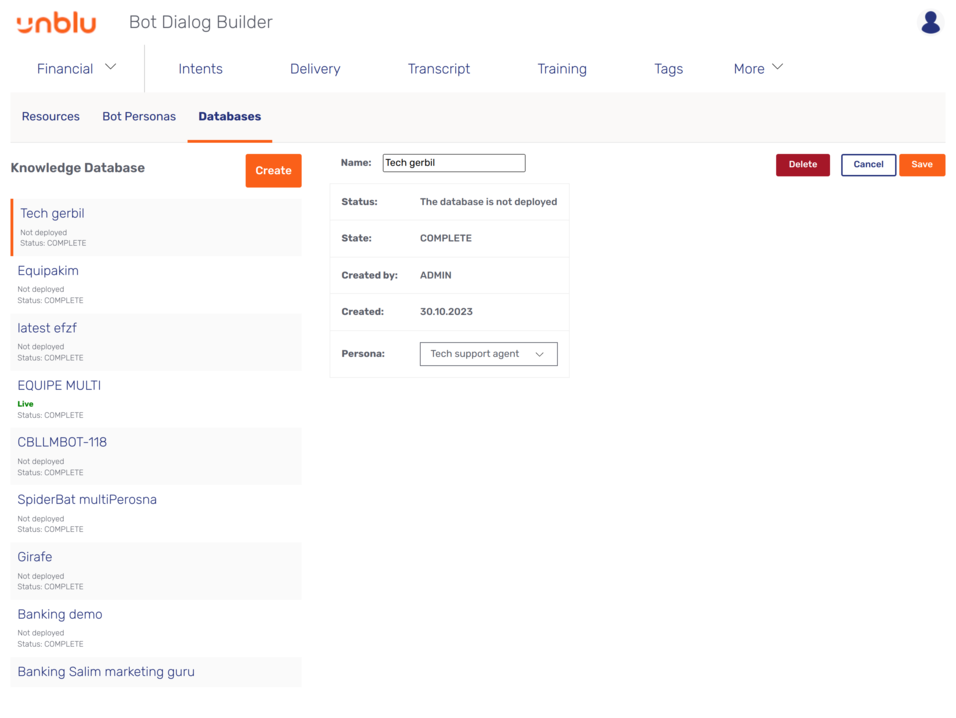
Click Save to save your changes.
If you update the deployed database and change its persona, you must redeploy the database after you’ve saved your changes. To do so, click the Deploy button in the upper right-hand corner. The button is clickable once the database update has been completed.
You can’t update the resources of a database once you’ve created it. If there are resources you want to add to or remove from the database, you have to create a new database. -
To delete a database, click the Delete button. A modal dialog appears asking Are you sure you want to delete the database <database name>? Click Yes to delete the database or No to cancel the deletion.